Build Manager
winIDEA's Build Manager maintains settings for all configured targets and keeps intermediate files (object, listing) in a separate Output directory - that is different for every Target. Besides keeping source directories clean, this assures that object files located in Debug target directory are compiled with Debug settings and object files in Release target directory with Release settings.
In addition, winIDEA separates project configuration settings from workspace settings in a separate project configuration file, which is generated automatically when the workspace file (*.XJRF or *.JRF) is generated. It carries the same name, however with a different extension (*.XQRF or *.QRF). This separation allows teams of developers to share the same copy of the *.QRF file while every developer can customize his individual setting in the workspace file.
When using source code control and versioning systems (SourceSafe, PVCS, etc.) you will want to control the project (*.QRF) file as well as your source files. Since the workspace file (*.JRF) is user specific, it should not be shared.
|
If you copy the workspace file (*.JRF) to a new directory, always copy the project configuration file (*.QRF) too, otherwise you will have no project settings when you open the workspace file in the new location. |
Stages of program development
winIDEA provides several specialized objects that facilitate integration of all stages of program development (edit, build and debug):
•Project window - Manage project hierarchy
•Project Toolbar - Run compilers
•Project Settings dialog - Configure compiler options:
Enabling Build Manager
By default Build Manager is disabled.
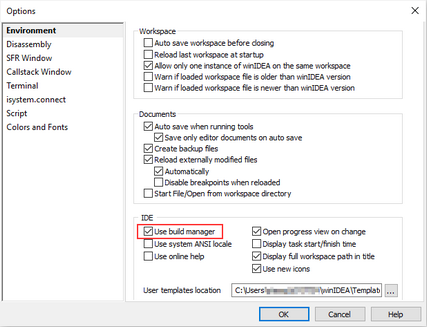 1. Go to Tools / Options / Environment. 2. Mark check box Use build manager. |
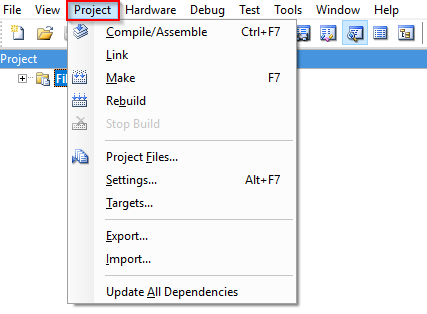 When enabled in the main winIDEA menus Project menu appears with all the commands. |
Detecting Changes to the Project
When the Build Manager is configured properly, it will check all project files and recompile/assemble those where:
•the object file does not exist
•the object file is older than the project file
•any of the header files used by a C project file is newer than the object file
•compiler/assembler settings for the project file have changed
A project will be linked (output file generated) when:
•the output file doesn't exist
•any of the object files is newer than existing output file
•linker settings have changed
•the indirection file has changed
Check is performed before the CPU operation is advanced (Download, Run/Stop, etc.). In such case the below dialog will ask you whether the project should be rebuild:
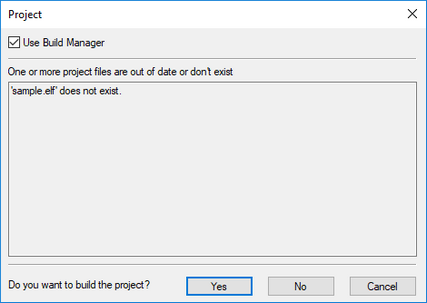 |
Project Organization
winIDEA adds two hierarchical levels between the project and files that it consists of (project files). These two levels are an abstract organizational form, which you can use if you feel the need to.
Project window
Refer to Project window chapter for more information.
Directory Organization
It is strongly recommended that all workspace and project related files are placed in the workspace directory or one of its sub-directories:
•Workspace file (*.xjrf)
•Project configuration file (*.xqrf)
•Project files (CPUTest.c, main.c…)
•Header files
The Debug sub-directory contains files generated by processing project files when the Debug target is selected. This includes object, listing, map, absolute object, symbol files, etc. in short everything that can be regenerated every time.
The Release sub-directory holds the same set of files, but they are generated by selecting the Release target. This separation of source and output files keeps source directories clean and brings additional advantages as described next.
Building
winIDEA's Build Manager can build on demand (compile or assemble) a single project file, all modified project files (make) or all project files (rebuild).
Icon |
Button |
Description |
|---|---|---|
 |
Compile |
Building a Single Project FileClick Compile button in the main toolbar or select Compile/Assemble command from the Project menu or context menu. |
 |
Make |
Building All Modified Project FilesClick the Make button in the main toolbar or select the Make command from the Project menu. |
 |
Rebuild |
Building All Project FilesClick the Rebuild button in the main toolbar Select the Rebuild command from the Project menu |
 |
Stop Build |
Breaking the Build - Abort the building Click the Stop Build button in the main toolbar or select the Stop Build command from the Project menu |
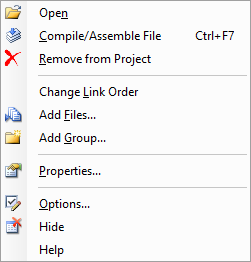
Context menu
Context menu is opened with right-clicking within the Project window.
|
Open - Open a file in the Editor window.
Compile/Assemble File
Remove from Project - Delete group, file etc. from the project.
Change Link Order - Link Order of Files and Groups (see below).
Add Files - Select/configure files for build. Alternative by clicking Project menu/Project Files.
Add Group - Enter the name for the new group when prompted for it.
Keep in mind: Creating more Groups
oIf you wish to enforce link order of an object file or group of object files, the easiest way to do it is to define as many groups (with descriptive names) as necessary. For a banked system, for example, such names could be Common, Vectors, Bank1 and Bank2 etc.
oWhen a hundred or more project files are used, you will find it hard to find them in the Project Workspace window. By organizing them in groups (again with descriptive names) you will find them much faster.
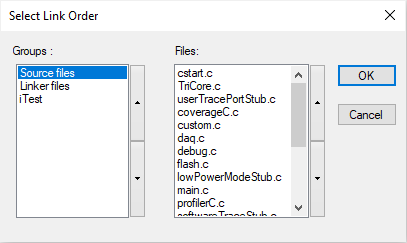
Change Link Order
Project's object and library files can be linked in specific order by selecting a group and moving it up and down in the list with the arrow buttons right of the list. Inside a group, project files are processed as they are listed in the Files list. Otherwise Build Manager processes groups and their project files in alphabetical order.
 |
Scope of Settings
Project settings can have one of following scopes:
•Global scope - Always valid (example: path to assembler EXE).
•Target scope - Valid when the respective target is selected (e.g. Target's output directory).
•File scope - Valid when a file is being compiled or assembled (e.g. compiler command line options).
Targets
A project can have one or more Targets. Target controls all project files by defining default command line options for newly added project files, and by defining an Output Directory for all intermediate files generated in compile, assemble and link process.
Target dialog is opened from Project menu / Targets:
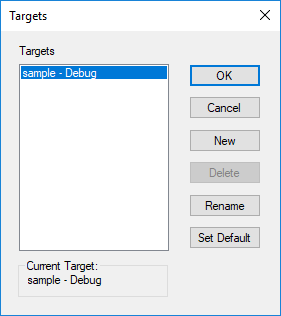 New - In the New Target dialog specify the name for the new target and choose whether default options should be used, or target settings copied from an existing target. When copying settings from an existing target, only target settings are copied - not for every individual project file. Files with explicitly set settings assume Target options in the new target. If you need to, you must configure them manually.
Rename - Specify the New Target Name for the target. Set Default - Discard current Target settings and return to winIDEA's hardcoded default settings. |
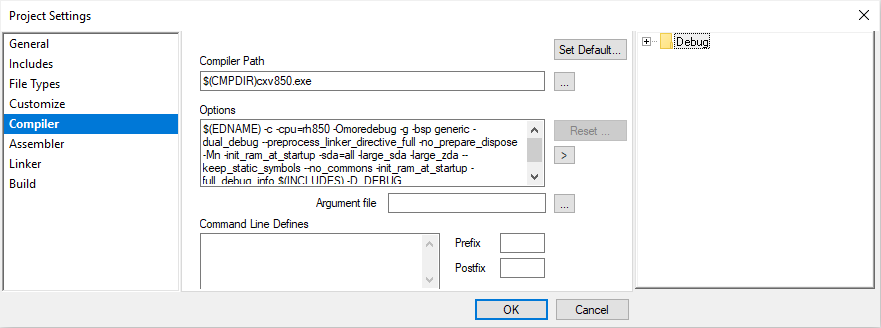 Modify targets settings1. Go to the Project menu / Settings. 2. In the Project Settings dialog select the desired Target and configure new Target settings. Every project file that you insert in the project will assume these target settings.
Set Default - Discard current Target settings and return to winIDEA's default settings. This changes Target settings and applies to newly added project files and to existing project files whose settings have not been explicitly set.
Reset - Apply Target settings to all project files which resets settings for every project file (including those, whose settings have been set explicitly) to current Target settings. |
|
Target settings are shown, and can be edited when the target’s name is selected in the tree view of the project. |
Project Settings
To take maximum advantage of Build Manager, numerous settings must be configured properly. winIDEA has ready-made example projects for all major compilers, which you can use as template workspaces for your new projects.
For quick starts and small projects, you can use an example workspace as a template for your workspace, for bigger projects however you will want to have more control over the Build Manager's settings.
Configuring Project Files
Select the Project menu/ Project Files, then select the files you wish to add, and the group you wish to add them to. When a project file is inserted in the project, a set of settings for every existing target is generated for it. For every target, current target settings are used.
Configuring Settings for Multiple Files
Settings for multiple files can be configured simultaneously. To do so expand the project hierarchy as needed, select project files, groups and targets that you wish to manipulate, configure settings that you wish all selected files to assume
Reset and Set Default button
In dialog pages where target and project file specific settings can be set two buttons are used to reset settings:
•Reset button - Preset settings for currently selected files to current target settings. Selecting Reset on any file or group of files, discards all settings that were defined explicitly (for a project file after it has been inserted into project).
•Set Default button - Enabled only when a target is selected. Clicking it will cause the selected target to assume settings that are hard coded into winIDEA. This will also affect settings of all project files in the target whose settings have not been changed explicitly.
Build Manager Macros
Whenever defining command line options, Build Manager macros can be used.
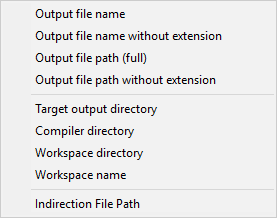
The macro list is opened by pressing the  button. The macros that are normally used for the option you are defining command line for are shown. The selected macro is translated to a simple note in the command line, which will be translated to the selected option.
Example: Macro selected Compiler output extension would translate to $(COUTEXT), which would translate when generating the command line option to, for example, OUT, which is the compiler output file extension.
|
Available Build Manager Macros and their descriptions
The macros listed here are marked by the macro name, its verbose name as it appears when pressing the button, and their description.
Macros |
Name |
Description |
|---|---|---|
$(CMPDIR) |
Compiler directory |
Path specified in the 'Project/Settings/General/Compiler toolset path'. |
$(IRFDIR) |
Workspace directory |
The Project root directory. |
$(WSPNAME) |
Workspace name |
The Project name. |
$(EXEDIR) |
winIDEA directory |
The directory where winIDEA.exe is located. |
$(EDNAME) |
Full file name |
The file name of the file currently compiled/assembled. |
$(DIR) |
Directory of file |
The directory of the file currently compiled/assembled. |
$(NOEXT) |
File name |
The file name of the file currently compiled/assembled, without file extension. |
$(OUTPUTFILE) |
Output file name |
The name specified in Project/Settings/General/Output file name. |
$(OUTPUTDIR) |
Target output directory |
Current target output directory as specified in Project/Settings/General/Output directory. |
$(OUTPUTPATH) |
Output file path (Full) |
Current target output directory as specified in Project/Settings/General/Output directory in full path form. |
$(OUTPUTNOEXT) |
Output file path without extension |
The name with path specified in Project/Settings/General/Output file name, without file extension. |
$(OUTPUTNAME) |
Output file name without extension |
The file name specified in Project/Settings/General/Output file name, without file extension. |
$(CEXT) |
Compiler Input Extension |
File extension specified in Project/Settings/File Extensions/Compiler/Input Ext. |
$(COUTEXT) |
Compiler Output Extension |
File extension specified in Project/Settings/File Extensions/Compiler/Output Ext. |
$(AEXT) |
Assembler Input Extension |
File extension specified in Project/Settings/File Extensions/Assembler/Input Ext. |
$(AOUTEXT) |
Assembler Output Extension |
File extension specified in Project/Settings/File Extensions/Assembler/Output Ext. |
$(FILEGROUP) |
File Group Name |
The name of the Group to which the currently compiled/assembled file belongs. |
$(INDPATH) |
Indirection File Path |
Expands the full path of the indirection file name. |
$(DEFINES) |
Defines |
The list of defines parsed to the C preprocessor. |
$(INCLUDES) |
Includes |
The list of include files specified in the Includes tab. |
Using an Example Workspace as a Template
You can make a quick start by modifying one of the example projects for the compiler that you use as follows:
•Use Windows Explorer to create a new directory for the new workspace.
•Copy workspace (*.XJRF) and project configuration (*.XQRF) files from the example project directory. You can rename them if you wish, just make sure that .XJRF and .XQRF extensions remain and that the names are the same.
•Copy any project files you wish to include in your project from the example directory. This could be startup files, interrupt function examples, etc.
•Open the newly copied workspace in winIDEA.
•Remove unused example project files from the project files list.
•Add your project files to the project files list.
•Select the Build command to rebuild the entire project.
Output windows in the build process
When the Build Manager processes a project file or links the project it creates a child process with redirected standard handles (STDOUT and STDERR). The child process runs in a hidden windows. Any captured output is displayed in the Output windows after the process ends. The output windows are scrollable, terminal style window that show raw or filtered output emitted by external tools spawned by winIDEA.
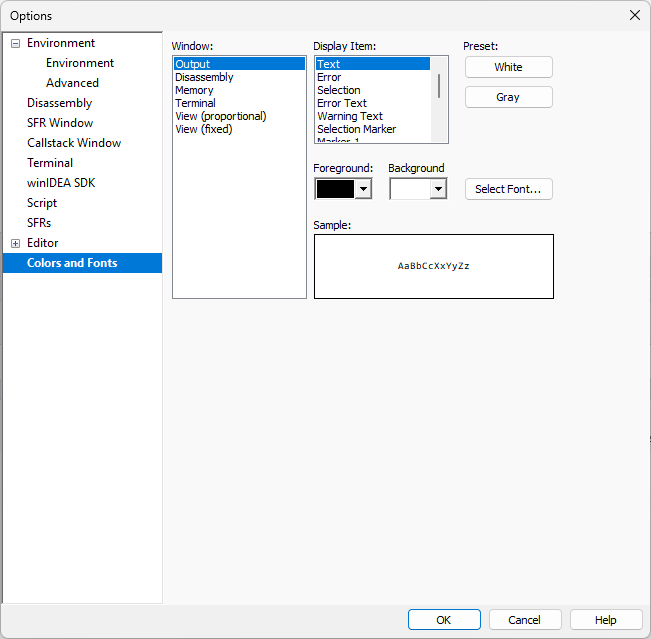
Colors and Fonts
Colors and Fonts dialog allows customization of fonts or colors-schemes for easier navigation. It is opened:
•By right-clicking in the window and selecting Options from the context menu or
•Selecting Tools / Options / Colors and Fonts.
You can customize colors and fonts for:
•Output windows
•Disassembly Window
•Memory Window
•Terminal Window
•View (proportional): Special Function Register (SFR) Window, Project, Symbols, Plugins, RTOS, Callstack Window
•View (fixed): Watches and Locals Window
|