How to unlock secure debug on NXP S32G2/3xx, S32R45x, and S32K3
In this topic:
•Unlock password-protected devices
•Unlock Challenge/Response protected devices
Introduction
This topic describes how to perform secure debugging with Password and Challenge/Response authentication methods on NXP devices:
•S32G2/3
•S32R45
•S32K3
Password authentication and Challenge/Response authentication are secure debug modes that prevent unauthorized debug access to the SoC by requiring the correct credentials to authenticate the debugger at the start of the debug session. Once successfully authenticated, the SoC remains unsecured until a power-on-reset or a similarly destructive reset occurs.
SoCs that are secured by Password authentication require BlueBox to provide a password to the SoC to unlock any further debug access. winIDEA provides an EVE script that automatically performs the necessary authentication on the start of every debug session.
If your SoC is secured by Challenge/Response authentication, you are first required to register your SoC using its unique identifier (UID) together with an Application Debug Key/Password (ADKP). NXP has provided a software tool (Volkano) through which you can register your SoC and also provides the necessary key wrapping that allows the device registration to be securely stored on either a PC or on an NXP smartcard without revealing the original ADKP. Unlike the Password-protected method, the secure ADKP key is not provided directly to the SoC. Instead, the SoC provides a random Challenge value to which the debugger responds with a Response value that is calculated by Volkano from the UID, ADKP and the Challenge value.
Once the SoC and ADKP are registered, authentication at the start of every debug session can be automatically performed in winIDEA using an EVE script.
S32K3 Specifics
S32K3 devices have multiple scripts in the winIDEA SFR folder, for example:
•S32K3xx_ConnectToSoC
•S32K39x_ConnectToSoC
•S32K31x_ConnectToSoC
•S32K38x_ConnectToSoC
Authentication can be performed either through a SDA Access Port or a JTAG Data Controller (JDC). Since the device supports SWD debug the SDA_AP is a must for SWD debug. For JTAG either one can be used.
Requirements
•winIDEA 9.21.48 or newer
•BlueBox
•Arm HSSTP II Active Probe or CoreSight Debug Adapter
Unlock password-protected devices
When the secure debug of your SoC is configured as password protected, BlueBox must authenticate itself with a password before it can proceed with the debug session. Perform the following steps to configure winIDEA for automatic password authentication.
|
Dialogs may vary between different devices. |
1. Add a custom script ConnectToSecuredSoC.cpp from the SFR folder to Hardware | SoC Options | Reset | Initialization before Programming | Connect.
2. Configure Parameters for the script.
a.Protection value to Password
b.Password (a 16-byte hex string) that is provided by NXP. Spaces should separate each byte value.
c.(for S32K3xx devices) Configure additional parameters, see S32K3 Specifics.

Example for S32G2/G3xx

Example for S32K3xx
|
Enable Same as Programming in Initialization before Debug session - Connect. |

|
Perform Download. |

The EVE script will handle the password authentication in the background on every new debug session.
Unlock Challenge/Response protected devices
When the secure debug of your SoC is configured as Challenge/Response, debug access to your SoC is locked until a valid response value is received in reply to the SoC’s Challenge value.
Volkano is a software package provided by NXP for computing this secure debug response value and to do so, your SoC must be registered to Volkano with its UID and ADKP key. The SoC registrations can be either securely stored on your PC or a NXP smartcard (S32 Debug Entry Authenticator).
To use Challenge/Response in winIDEA the following steps need to be performed:
Obtain SoC UID (unique ID)
Before the SoC can be registered to Volkano you need to obtain its UID. In winIDEA perform the following steps to read the UID from your SoC.
|
Select Debug | Prepare to Attach. |

The target device/SoC should be connected and powered.
|
Navigate to Help | Support | Log and enable (27) EVE logging. |

|
Select Hardware | Scripts | Read UID. |
After execution of this script the UID of the SoC is displayed in the Progress window.
I 01B : ---------------------------------- |
Volkano configuration
The following steps guide you through the procedure to initialize Volkano and to register your SoC.
|
Run command prompt and navigate to the folder. |
Volkano is located in the folder NXP/SDAF_1.0.0. within your winIDEA installation folder.
|
If you are using an authentication smartcard, make sure that your card reader is recognized by Windows and that the smartcard is properly inserted. |
|
Generate the wrapping keys by entering the following command. |
volkano -cmd generate_wrapkey |
|
(optional) Provide a user password. |
If you are using an authenticator smartcard, you are now required to provide a user password. Skip this step if you are not using the authentication smartcard.
volkano -cmd update_pwd <your_password> |
|
The password can only be set when using the authenticator smartcard. Once set, you will need to authenticate yourself with this password for every other command in the volkano.exe API using the -pw option. For example: volkano -cmd discover -pw <your_password>. |
|
Export the public part of the wrapping key to a binary file. |
volkano -cmd export_wrapkey |
|
Now wrap the ADKP value. |

The ADKP value (Application Debug Key/Password) belonging to your SoC with the public key that you have generated in the previous steps. The ADKP value (a 16 byte hex string) for your SoC is provided by NXP.
Example: “50617373776F72642D30322D32303230”
volkano_utils -cmd wrap_adkp -adkp <ADKP value> -keybin wrap_key.bin |
|
Register the UID. |

Now that the wrapped key is generated, you can register the UID. Enter the UID value of the SoC you want to debug and provide the key that was generated in the previous step. UID string example: “8AAA63550B301511”
volkano -cmd register_adkp -uid <UID value> -key <ADKP wrapped with the wrapping key> |
You can now easily register more UIDs, by changing only the UID value in the same command.
|
To make sure that your SoC is successfully registered you can type the following command. |

volkano -cmd discover |
winIDEA configuration
To use the script which will automatically perform the authentication on every debug session follow the steps below. The example is based on the S32Gxx device.
|
Follow the steps from 1 - 4 from previous configuration and change the Protection value into Challenge_Response. |
|
(optional) If the device registrations are stored on an authentication smartcard, also enter the Password value. Otherwise leave the value as the default \0. |
|
In Hardware | SoC Options make sure that Same as Programming in Initialization before Debug session is enabled. |
|
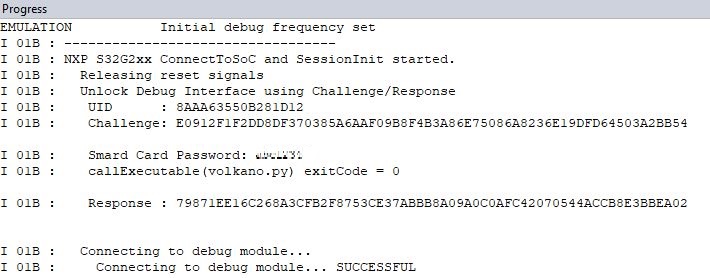
Perform Download. |
The script will handle the Challenge/Response authentication in the background on every new debug session. In the Progress window you can observe the authentication procedure. Note that the output of the authentication procedure is only shown if EVE logging was previously enabled.