NXP S32R294: Non-secure boot
In this topic:
•Python script and Initialization sequence script examples
Introduction
This topic describes how to achieve a non-secure boot on S32R294:
•when booting from QSPI flash - using aPython script;
•when downloading the application directly to RAM - using the attached initialization sequence.
When needed to boot the device in non-secure mode (e.g., on S32R294 trace is enabled by boot ROM when it ends booting from QSPI in non-secure mode), a specific sequence must be performed. To boot the SoC from QSPI, a valid QSPI image must be present in the QSPI flash (not just application code, but a valid IVT image).
After that, the Python script is run, which temporarily selects non-secure mode and forces boot. Alternatively, eFuses can be programmed as a permanent solution to select non-secure boot, e.g., when the target is expected to run standalone.
In early development, it might be more convenient to load the application directly to RAM, rather than building an IVT image and programming the QSPI flash every time there is a change in the application. However, this is not treated as a “valid boot” process by the CPU, so the SEC_BOOT register is not written to, and consequently, the trace will not be enabled. A simple initialization sequence can be executed from winIDEA to overcome this issue.
Requirements
•winIDEA 9.17.140 or newer (with a matching SDK)
•BlueBox iC7, iC5700
•MPC5xxx/SPC5 Aurora Active Probe
Python script and Initialization sequence script examples
The scripts should be used as a reference and changed according to the required operation (READ or WRITE):
Sequence for non-secure boot
From QSPI Flash
|
Copy the script to your workspace folder. |
|
Open your workspace in winIDEA. |
|
Disable Latch Target RESET option in Hardware / CPU Options / Reset. |
|
Start a Debug session (e.g., using Reset in winIDEA). |
|
(optional) Program the QSPI flash with a valid IVT image. |
Not necessary if the image is already programmed.
|
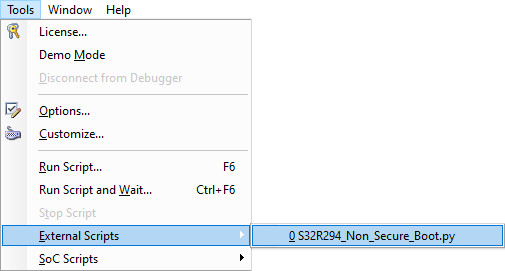
Run the Python script via Tools / External scripts. |

Explanation
The Python script selects the non-secure boot mode and sets a breakpoint, which covers the complete RAM area. After that, it resets core via MC_ME register.
Then, the CPU (in executing the boot code) does the following:
•After reset, the QSPI image is read.
•Then the application is copied to RAM.
•The PC is preset to the entry point and the CPU is put into running.
•CPU stops because of the breakpoint.
The Python script has a delay of 500 ms so that the CPU can execute the sequence above. After the delay, the breakpoint is removed and CPU context is invalidated (so that the right PC value is displayed).
When the target is intended to run standalone, i.e., when the IVT image is valid and the application runs correctly, the user can opt to program the eFuses to enable the SEC_BOOT. This means that at the boot time, eFuse will be read and written to the SEC_BOOT register, and no intervention from the debugger is necessary.
Downloading directly to RAM
|
Copy the SEC_BOOT.ini file to your workspace folder. |
|
Open your workspace in winIDEA.. |
|
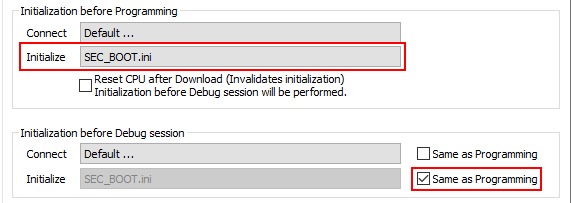
Open Hardware / CPU Options / Reset and add the SEC_BOOT.ini script in Initialization before Programming / Initialize. |
|
Check the Same as Programming check box in Initialization before Debug session / Initialize. |

Explanation
When the boot ROM finishes non-secure booting, it writes to the SEC_BOOT register. When the application is loaded directly to RAM, the boot ROM does not execute, and therefore the SEC_BOOT register is not written to. By specifying the SEC_BOOT.ini sequence in winIDEA, we ensure that the SEC_BOOT register is written to by the debugger, which is then treated by the CPU as if the boot ROM has finished booting.
Additional resources
Script, which can be used for eFuse programming, can be found in the topic NXP S32R294: eFuse programming.
|
To select Secure boot mode on S32R294, eFuse 0x240 must be programmed with value 0xC0. |


