How to Configure External Flash Cypress S70FS01GS Sector Map
In this topic:
Introduction
Cypress S70FS01GS Flash non-volatile memory device implements JEDEC standard supporting Serial Flash Discoverable Parameters (SFDP). However, the S70FS01GS device is a dual die stack of two FS512S dies with consecutive memory addresses and prior to the first use initial formatting is required.
To use the S70FS01GS Flash Device, sector map needs to be configured. Configuration is set in the Configuration Register 3 Non-volatile (CR3NV). To configure the device, at least one of the 20h_NV bits in CR3NV registers of each die needs to be set.
The following index value combinations are supported for each die:
Index Value |
Low Address CR3NV[3] |
High Address CR3NV[3] |
Description |
|---|---|---|---|
01h |
0 |
1 |
4 KB sectors at bottom with remainder 256 KB sectors |
02h |
1 |
0 |
4 KB sectors at top with remainder 256 KB sectors |
03h |
1 |
1 |
Uniform 256 KB sectors |
If the device is configured to one of the first two options, only one CR3NV register has been modified. In this case the device can still be configured to uniform 256 KB sectors.
The BlueBox debugger can configure Sector Map by either:
•Running a Python script via winIDEA
•Running a Python script via winIDEA SDK
|
CR3NV bits are the One-Time Programmable (OTP) type. Refer to the Flash device data sheet for more information about Sector Map Parameters and Configuration. |

Requirements
•winIDEA 9.17.160 or newer
•BlueBox
•Active Probe or Debug Adapter
Python script example
Download and unzip the script example via the link: S70FS01GS_sector_map_config.7z
The script includes all 3 available configurations. By default, script configures the 4 KB sectors at bottom, while the other two options are commented out. To select any other configuration, comment out the default configuration and uncomment the required configuration.
Configuration steps
|
Modify the script according to the required configuration. |

|
Save it in the same folder as winIDEA workspace. |

|
Start Debug session |

Debug status must be STOP .
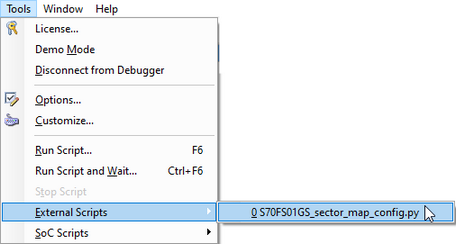
|
Run the Python script via Tools | External Scripts. |

More resources
•Running Python scripts in winIDEA