winIDEA licensing
Overview
Every new BlueBox used with winIDEA starts with a 30-day evaluation period. During this period, all available features are temporarily enabled so you can evaluate the complete toolchain.
Depending on your license setup, winIDEA can use license:
•stored directly in the BlueBox
•provided by TASKING License Manager (TLM)
TLM supports floating server-based licenses, node-locked client licenses, license borrowing, and licenses for additional products and add-ons.
For more information, refer to:
•Licensing - general information about TASKING licensing
•Licensing FAQ - troubleshooting tips
•TLM help - TASKING License Management documentation
Use a BlueBox license
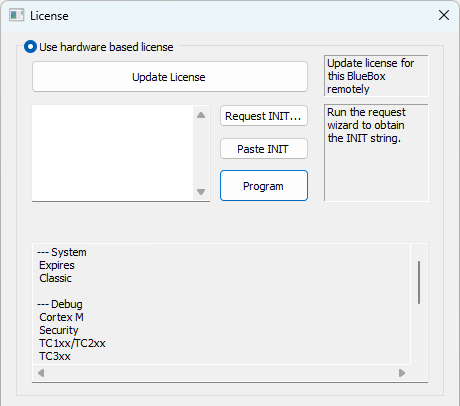
A hardware-based license is stored directly in the BlueBox.
1.Connect and power the BlueBox.
2.Select Tools > License.
3.Select Use hardware-based license.
If the BlueBox is connected and powered, winIDEA reads the license and displays the available license information.
Update a BlueBox license
If you purchased a license upgrade or changed the licensed features, update the license stored in the BlueBox.
1.Connect and power the BlueBox.
2.Open Tools > License.
3.Select Update License.
The PC running winIDEA must have internet access.

If an online update isn't available, use
•Request INIT string
•Program INIT string
Use TASKING License Manager (TLM)
TASKING License Manager (TLM) provides licenses from a license server or from a node-locked license installed on the client computer.
TLM is supported in winIDEA 9.21.253 and newer.
1.Open Tools > License.
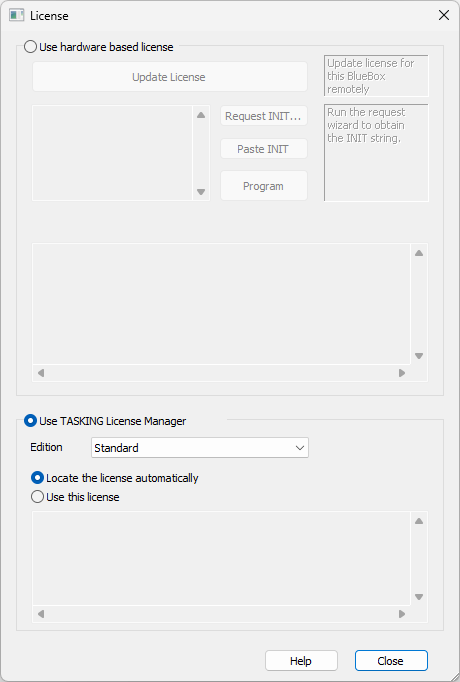
2.Select Use TASKING License Manager.
Select the winIDEA Product / Edition
Select the required winIDEA Product or Edition from the drop-down.
winIDEA attempts to acquire license of this type when starting a session.
|
The product selected here determines which license the current workspace uses. This is different from the Product selection in the TLM Configuration dialog, which is used to perform license-management operations. |


winIDEA Add-on products
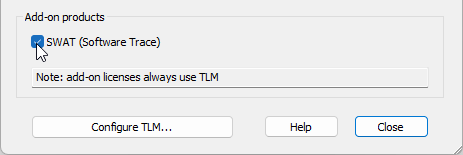
The Add-on products section shows additional licensed functionality used by the current workspace.
Add-ons, including separately licensed functionality such as the AI add-on, use TLM licensing.
Configure TLM
Select Configure TLM on the bottom of the dialog to configure how this computer obtains and manages TLM licenses.
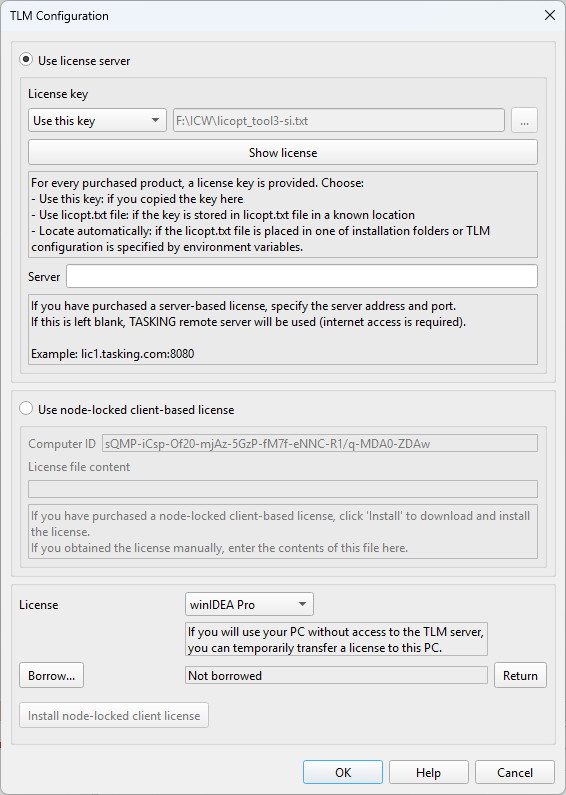
The TLM Configuration dialog has three main areas:
•License server configuration - Defines where the license key is obtained and which license server is used.
•Node-locked client license - Configures a license assigned directly to this computer.
•Product management - Lets you borrow, return, install, or test licenses for individual products.
Configure a license server
Select Use license server to acquire licenses from a local or remote TLM license server.
Configure the license key
For License key, select one of the following options:
•Locate automatically - Automatically locates the license configuration in the default installation folders or uses TLM configuration provided through environment variables.
•Use this key - Enter the license key directly in the dialog. This is usually the simplest option for individual users or small installations.
•Use licopt.txt file - Specify the location of a licopt.txt file containing the license key. A shared licopt.txt file can be useful for larger installations because multiple users can use a centrally maintained configuration. Changes such as license upgrades can then be managed in one place.
•Show or hide the license key - The license key is hidden by default to prevent it from being exposed, for example when the computer is used in a public environment or during screen sharing. Click Show license to display and edit the key.
Configure the server
The Server field determines which TLM license server is used.
•For a Remote License Server, leave Server empty. Internet access is required.
•For a Local License Server, enter the server hostname or address and port.
For example:
lic1.tasking.com:8080
Examples
•Remote License Server
oLicense key: Use this key
oServer: empty

Use this key option and Remote License Server - Server field is left empty
•Local License Server
oLicense key: Use licopt.txt file
oServer: server address and port

Use licopt.txt file option and Local License Server - Server and port is specified
Configure a node-locked client license
A node-locked client license is assigned to a specific computer instead of being acquired as a floating license from the server.
The dialog displays the Computer ID that identifies the computer for licensing.
Select Use node-locked client based license.
If you already received a node-locked TLM license file, enter its contents in License file content.

You can also retrieve the license from the configured TLM server. Select Install button.

|
A TLM license file isn't the same as the licopt.txt license option file. The licopt.txt file configures access to TLM, while the TLM license file contains the node-locked license installed on the client computer. |
Manage winIDEA TLM product licenses
The lower part of the TLM Configuration dialog contains operations for individual TLM winIDEA products.
These controls apply to the system-wide winIDEA TLM configuration. They don't determine which product the current winIDEA workspace uses.
License
Select the product whose license you want to manage.
You can perform operations for different products independently. For example, you can borrow licenses for several products one after another.
Borrow a license
Click Borrow to temporarily store a floating license for the selected product on this computer.
Borrowing is useful when you need to use the product without access to the TLM server, for example when:
•working offline
•travelling
•working outside the company network
Select the required Product, then click Borrow. The field next to Borrow shows the current borrowing status.
A borrowed license remains unavailable to other users until it is returned or the borrowing period expires.
Return a borrowed license
Click Return to return a borrowed license to the TLM server before its borrowing period expires.
Select the corresponding Product, then click Return.
After the license is returned, it becomes available to other users again.
Install node-locked client license
Install node-locked client license is available when Use node-locked client based license is selected.
Click the button to retrieve the TLM license file for the selected product from the server and install it on the client computer.
Requesting INIT string
1. Request INIT string via Tools > License > Request INIT.
License dialog for winIDEA 9.12.288.2 version and older is located under Hardware > License.
2. Type in the License serial number.
3. Complete the registration data.
4. Verify the e-mail method the INIT string request.
The Wizard will automatically create an email in your outbox and attach a file containing the INIT string request.
If you have problems sending out the request within winIDEA by email, press Create request file to create a text file and send the generated file LICENSE.ILR in a separate email to license@tasking.com.
Programming INIT string
The INIT string and registration information via be send via email.
1. Copy the INIT string to the clipboard.
2. Start winIDEA with the BlueBox attached and powered.
3. Open the Tools > License.
4. Select Paste INIT.
The INIT string is automatically pasted from the clipboard into the dialog box.
5. Select Program and then confirm with Yes.
A message appears after the license was programmed successfully. The License tab now displays the programmed license information.
See also
•Licensing - general information about TASKING licensing
•Licensing FAQ - troubleshooting tips
•TLM help - TASKING License Management documentation