Renesas RH850: Challenge & Response Authentication
In this topic:
•winIDEA version 9.21.8 and newer
•winIDEA version 9.21.294 and newer
•winIDEA version 9.17.146 – 9.21.7
Introduction
This topic describes how to enable PE and ICUM debugging using Python scripts, when the Challenge & Response Authentication is enabled. Intelligent Cryptographic Unit Master (ICUM) is a RH850 Hardware Security Module (HSM) core that can run secure cryptographic operations. The ICUM is disabled at device shipment. For a debug access the ID code authentication must be performed by a debugger. When the ICUM is enabled and connected to a debugger, a security level can be raised with the addition of the Challenge-Response authentication.

The BlueBox debugger can unlock the debug interface for PE core(s) and ICUM, by using a Python script as an authenticator interface between winIDEA and a user authentication software.
Requirements
•winIDEA 9.17.146 or newer
•BlueBox
•RH850 Debug Adapter
Python script examples
Download and unzip the script examples via the link: RH850_CR_Authentification.7z.
|
The provided script examples need to be adapted your specific needs. |
Configuration steps
After downloading the Python scripts, specify the external user app in the attached Python file(s) and save it in the same folder as the winIDEA workspace. Use the following steps to run the script in winIDEA. Configuration procedure depends on your winIDEA version. Both procedures are described below:
•winIDEA version 9.21.8 and newer
•winIDEA version 9.21.294 and newer
•winIDEA version 9.17.146 – 9.21.7
winIDEA version 9.21.8 and newer
|
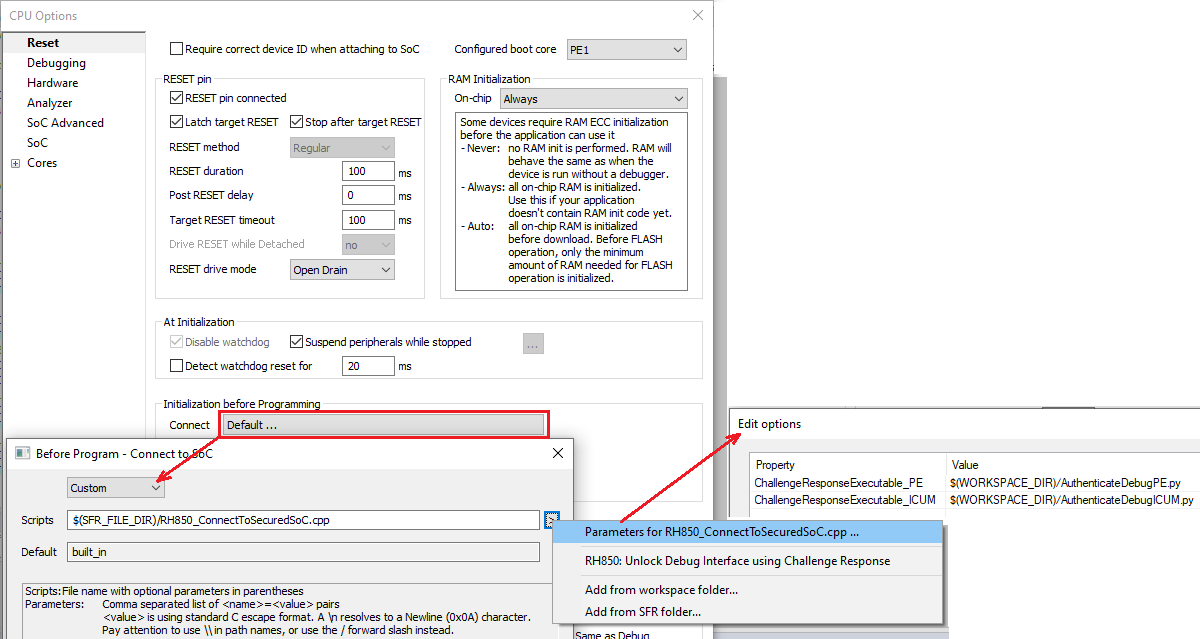
Add a custom script via Hardware | CPU Options | Reset. |

|
Press the arrow button to: |

•Add the script RH850: Unlock Debug Interface using Challenge Response.
•Select Parameters for the script.

|
Press "..." button and add the Python scripts. |

•AuthenticateDebugPE.py in the ChallengeResponseExecutable_PE field.
•AuthenticateDebugICUM.py in the ChallengeResponseExecutable_ICUM field.
Prepend both entries manually with a path to a Python executable. Note that the forward slashes are required. The concatenated command string should look something like this:
$(/SFR_FILE_DIR)RH850_ConnectToSecuredSoC.cpp("ChallengeResponseExecutable_PE=python $(/WORKSPACE_DIR)AuthenticateDebugPE.py","ChallengeResponseExecutable_ICUM=python $(/WORKSPACE_DIR)AuthenticateDebugICUM.py")
Challenge will be passed to executable over stdio as a hex string. Response should also be returned from executable as a hex string. After the next session start the authenticated cores should be unlocked for debug.
winIDEA version 9.21.294 and newer
These versions handle the script parameters a bit differently than above. The configuration is the same, except that the dialog property values now contain only the path to the authentication script. A system default python.exe is used. However, the default executable can be overriden by entering the 3rd parameter, for example, when a 32-bit authentication DLL is incompatible with the default 64-bit Python executable. Leave the PythonOverride parameter empty when not needed. See the examples below.

Challenge&Response parameters using default Python executable

Challenge&Response parameters using a specific Python executable
Note that when the script path is selected via the [...] dialog, it may have a backslash before the .py script name, for example, ${WORKSPACE_DIR}\AuthenticateDebugPE.py. Unfortunately, this creates an escape sequence '\A'. Please remove the inserted backslash.
winIDEA version 9.17.146 – 9.21.7
|
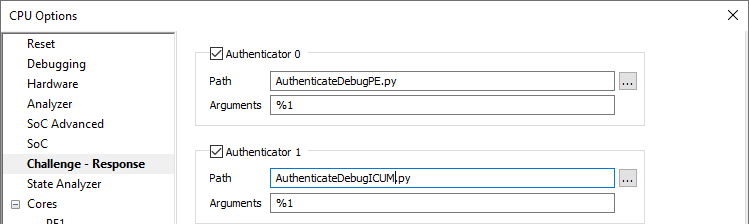
Open dialog Hardware | CPU Options | Challenge – Response page. |
|
To unlock debug access to PE core(s) check Authenticator 0. |
|
Press "..." button and specify AuthenticateDebugPE.py. |
|
To unlock debug access to ICUM core check Authenticator 1. |

|
Press "..." button and specify AuthenticateDebugICUM.py. |

After the next download authenticated cores will be unlocked for debug.