Install winIDEA Debug Extension for Visual Studio Code
In this topic:
Introduction
In this tutorial, you will learn how to get started with the winIDEA Debug Extension for Visual Studio Code.
You will follow the initial setup Walkthrough to get started with the extension and learn how to select and open an winIDEA Example Workspaces to quickly set up your environment. Example Workspaces are used for a simulator or evaluation purposes and you can take them as a reference for your own configurations to get started with a new project as quickly as possible.
For more information, refer to Visual Studio Code Extension.
Requirements
•winIDEA 9.21.229 or newer
•Visual Studio Code February 2024 release or newer (recommended)
Installation steps
1. Install and launch Visual Studio Code.
2. Open the Extensions tab from the Activity bar on the left.
3. Search for TASKING winIDEA and click the Install button.
This will also install the TASKING Hex Editor.
4. Follow the Get Started with TASKING winIDEA Walkthrough.
If it doesn't open automatically on extension install, you can open it from the Welcome page, or from the command palette: Ctrl + Shift + p / Welcome: Open Walkthrough / Get Started with TASKING winIDEA.
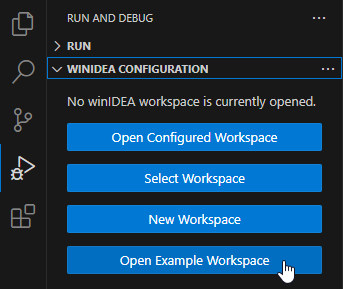
5. Select Run > winIDEA Configuration > Open Example Workspace.
The first time this step is executed, you will be prompted to install winIDEA. Select:
•Install now - Automatically install the latest version.
•Select custom install - Use a version already installed in your system.
6. For a quick setup and overview, select the QEMU (simulator) example.

7. (optional) To make winIDEA visible, set Show Window to true in Settings > Extensions > TASKING winIDEA.

More resources
•winIDEA Debug Extension - Overview and docs within Visual Studio Code Marketplace
•Hex Editor - Overview and docs within Visual Studio Code Marketplace