Editor
In this topic:
•Highlighting text in the Editor
Introduction
The Editor window shows the content of the selected file in the project workspace. This usually starts with the display of the source code that contains the main() function being displayed in the Editor window. The Editor window also offers the options:
•Set, clear a breakpoint and disable breakpoints
•Use Run/stop functions
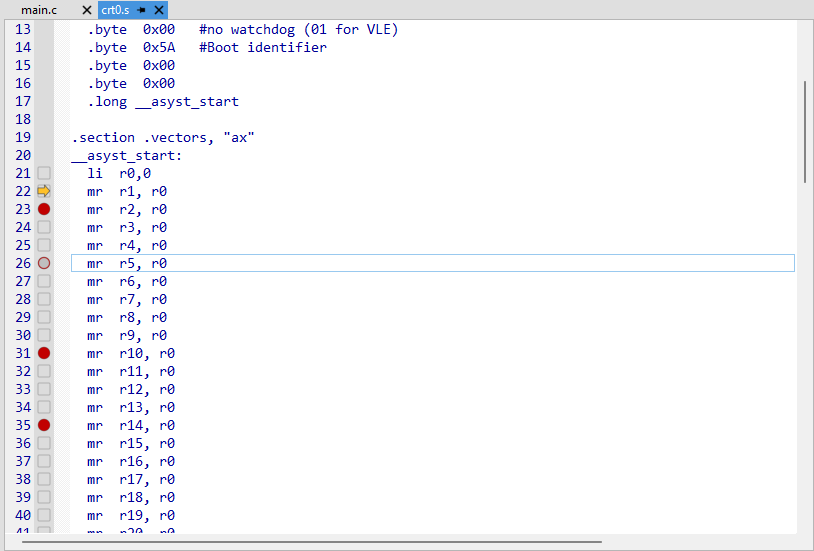
Breakpoint margin
The bar shows where breakpoints can be set. In this region also line numbers can be displayed.
Icon |
Description |
|---|---|
|
Line, where breakpoints can be set. |
|
Enabled breakpoint. |
|
Disabled breakpoint. |


|
Be careful with code that has been built with code optimization switched on! Some code lines will not necessarily have a position where a breakpoint can be set although there is source code displayed at that line. |

Editor pane
Displays the source code or the content of any selected file or document. Functionalities in Editor for easier navigation:
•File list pop-up
•Navigating using keyboard shortcuts in chapter Shortcuts.
Editor bar
List drop down of documents - If there is not enough space to show all document a drop down button  appears and it lists hidden documents.
•Highlighted document - Current top document
•Pinned documents.
•Greyed out documents - Pinned out documents.
Pinning/unpinning documents - Pin a document to stay in reach.
Context menus - Right-clicking on a document tab/empty space opens context menu with various close actions, open containing folder and copy name/path of the document.
Toolbar
Button |
Description |
|---|---|
|
Set / remove breakpoints - shorcut F9. |
|
Open dialog Execution Breakpoints. |
|
Toggle Hardware Breakpoints. |


Run/Stop
winIDEA allows you to step through code in four different ways. Stepping can be also performed at disassembly level.
Button |
Description |
|
|---|---|---|
|
Step |
Step into the next statement/function - shortcut F11 Step feature enables line-by-line code execution whilst examining variables and register content changes. |
|
Step Over |
Step over the next statement/function - shortcut F10 Enables the option to execute a entire function call and stop again when the starting point of the next line of code is reached. |
|
Run Until |
Run program until the current/specified position - shortcut CTRL + F10 (or right-clicking Run until in the context menu). Run Until function enables you quickly execute a portion of code without needing to set a breakpoint. It navigates you to either the next breakpoint or to the position where you clicked in the code depending on which one is next in program execution flow. |
|
Run Until Return |
Run until current function exists - shortcut SHIFT + F11 Useful when examining the execution of the first few lines of a function using Step and then wanting to quickly execute the remainder of the function. |


|
If unexpected behavior (jumping backwards or skipping lines of code, should occur, might be a result of the use of code optimization during compilation. |
Disabling and clearing/deleting breakpoints
winIDEA differentiate between disabled or cleared/deleted breakpoint:
Clear breakpoints |
Disable breakpoints |
|---|---|
Deleted |
Still visible, but do not execute |
Have to be set again |
Can be enabled again |
Can not be found again |
Can be used as a bookmark |
|
Disabling breakpoints leaves a visible mark in the glyph margin making it easy to re-enable the breakpoint again if required. |
Context menu
Right-clicking within the Editor pane opens context menu.
Toggle/Next/Previous Bookmark - Mark part, line of code/move to next or previous bookmark.
Advanced
•Tabify/Untabify Selection
•Toggle line column - Insert/Remove line comment. (Shotrcut '/' )
•Toggle block comment - Insert/Remove block comment. (Shortcut '*' )
Properties - See below.
Options - Open dialog to set fonts, Whitespace.
Open - Open C Header file.
Compile - Compile source file.
Next Error - Move to the next error in the code generated by the build manager.
Set Breakpoint, Run Until, Goto, Show Execution Point - Operate with Breakpoints.
Show Disassembly - Open Disassembly Window and show disassembly from the relevant line.
Auto Show Disassembly - Open Disassembly Window and show disassembly when moving through the code.
Add File to Templates - Add file/document to templates to use it next time.
Highlight text - If selected highlight selected text with 12 predefined colors.
Find and Replace
The Find and Replace feature in the winIDEA Editor window offers search and text manipulation capabilities. To access the Find and Replace feature, press CTRL + H.
Toolbar
Icon |
Description |
|---|---|
CTRL + H |
Show Find/Replace window. |
CTRL + F |
Switch back to/show Find window. To find string set a cursor in the word or double click. |
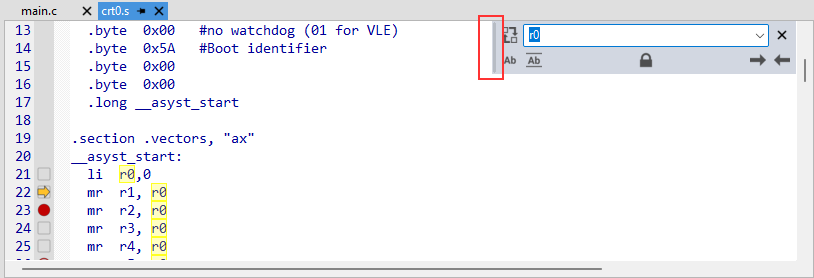
Resize the Find Window |
Drag the left border (marked red) left and right. |
|
Limit the search to Case Sensitive (ALT+C) |
|
Limit the search to Whole Words (ALT+W) |
|
Lock icon (Mark Results) - Mark the occurrences of the current search string for later use (ALT+M). Remove the marked results right-click within the Output window and select Remove all Occurrences. |
|
Search forward - F3 or arrow button keys left and right. |
|
Search backward - SHIFT+F3 or arrow button keys left and right. |
 |
Toggle between find and replace modes. |
 |
Replace Only in Current Selection - Replaces occurrences of the specified string only in the currently selected part of the text in Editor. |
 |
Replace Next. |
 |
Replace All. |


Highlighting text in the Editor
This text highlighting feature is allows you to visually distinguish and emphasize specific content within your code. Command will highlight text in 12 predefined colors. Just select text or set a cursor/caret, double click and right-click to open the Context menu.

Properties
The Properties dialog is allows you to manage File Name, Language and Encoding type.
File Name - Displays the location of the file on disk. The user can select and copy the text.
Language - Select the appropriate programming language of the document. Upon first opening the file, the language is auto-detected from the file name extension, however, this detection may be incorrect if the file is not named according to commonly used conventions.
The Language selection affects syntax coloring, code folding and auto-completion, where available. If a language is not supported, the Text option should be selected. In such case, code folding and syntax coloring are not supported.
Encoding - The default encoding is set to the default setting in the user's installation of Windows. If characters are not displayed correctly, the correct encoding should be set. This setting is set for each file individually and does not affect the encoding settings globally. The UTF-8 encoding gives the best support for international documents and non-western characters.