Hot attach
In this topic:
Introduction
Hot Attach and Detach functionality allows you to attach (and detach) the BlueBox development system to a running target system without affecting its operation and have all debug functions available. As such, it is a very convenient troubleshooting tool when the application malfunctions after a longer time.
Requirements
•Fixed voltage based on the Target
•Drive RESET while Detached configured to ''no''
Important notes
•10-pin 1.27mm Infineon DAP2 Wide Debug Adapter (IC50163-2) and all Active Probes do not support Hot Attach in a sense of connecting to a live target with the cable. You need to attach the cable to the target before running the application.
•Using any of the Download or Reset functionalities will in fact reset the microcontroller (whereas in older winIDEA versions Download has been ignored while in the Hot Attach state).
•Hot Attach on RH850 is not possible with Mictor 38-pin Nexus debug & trace adapter. Use LPD debug connector for Hot Attach.
•Hot Attach is not supported on MPC51xx devices.
•Detach procedure can also be executed with or after Debug | Download.
Perform Hot Attach procedure
Target is powered and running. Your BlueBox is off and physically disconnected to the target.
1. Set fixed voltage based on the Target in Hardware | CPU Options | Hardware, section Debug I/O levels.
This might not be needed for some newer Active Probe adapters.
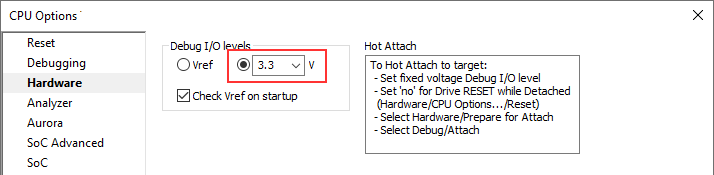
2. Set Drive RESET while Detached to 'no' in Hardware | CPU Options | Reset, section RESET pin.
3. Connect your BlueBox GND and the target GND using the grounding wire.
4. Power on your BlueBox.
5. Power on your Target.
6. Select Debug | Prepare to Attach.
Wait for SoC DETACHED Debug Status.
7. Attach to the Target via Adapter or Active Probe.
8.Select Debug | Attach to establish debug connection with the microcontroller.
Perform Detach procedure
Debug session is active. Your target is powered and running, Debug Status shows RUN .
1. Disconnect debug session via Debug | Detach.
Debug Status will change to SoC DETACHED .
2. Disconnect the Adapter or Active Probe from the Target.
3. Disconnect from the BlueBox via Debug | End Session.
Debug Status will change to OFFLINE .
4. Power off the BlueBox.
More resources