Trace Templates
In this topic:
Introduction
Defining trace qualifiers to reach desired results can be a complex task. Using a trace template can significantly ease the task. You can create your own template or use a provided (built-in) template or use a custom-made template designed to your application requirements.
Folder structure in your home directory:
•Arm Cortex: ...\iSYSTEM\winIDEA\Templates\Trace\Cortex or
•Infineon TriCore: ..\iSYSTEM\winIDEA\Templates\Trace\TriCore
Creating a Template
Manually configure Triggers, Events and Actions in the required observation blocks.
|
Open Analyzer Configuration dialog via View | Analyzer | Analyzer Configuration button in the Analyzer toolbar. |

|
Enable Manual Hardware Trigger and click Configure. |

|
Click the Create Template button. |


|
Name the template, put down the description (optional) and create trigger parameters by moving items from Changed Items to Parameters list. |

|
Click OK and a .xwz file is created in your home directory. |

|
Created templates can be distributed to other users - Go to Tools | Options. |
Using a created Template
|
Select Create New Configuration in the Analyzer window. |
|
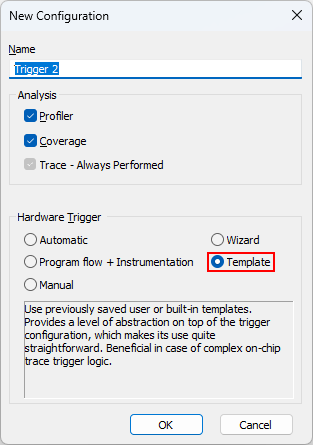
Select Template under Hardware Trigger Configuration in the newly opened New Configuration dialog. |
|
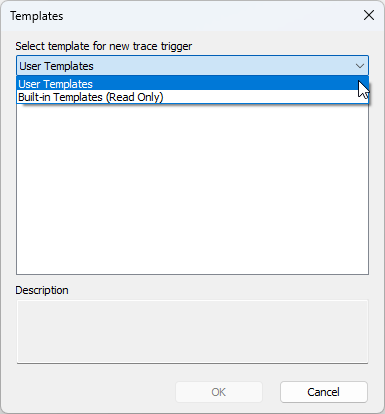
Select User templates in Templates dialog. |
|
Select a template that suits your application requirements. |
Importing a custom Template
|
Copy the custom .xwz template to your home folder. |
Include the following folder structure:
•Arm Cortex - ...\iSYSTEM\winIDEA\Templates\Trace\Cortex
•Infineon TriCore - ..\iSYSTEM\winIDEA\Templates\Trace\TriCore
|
Select Create New Configuration in the Analyzer window. |
|
Select Template under Hardware Trigger Configuration in the New Configuration dialog. |
|
Select User templates in Templates dialog. |
The imported template should be listed in the dialog.
|
If having problems creating folder structure, first create a template yourself. The folder structure will be created automatically. Copy your custom template in the same folder as your template was created in. |
|
Created templates can be distributed to other users - Go to Tools | Options. |
Use a Built-in Template
|
Select Create New Configuration in the Analyzer window. |
|
Select Template under Hardware Trigger Configuration in the New Configuration dialog. |
|
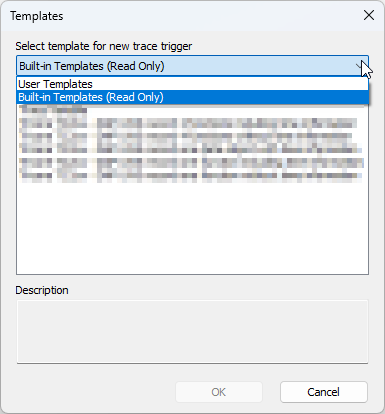
Select Built-in templates (Read Only) in Templates dialog. |
|
Select a template that suits your application requirements. |
|
Built-in templates are read-only, but can be modified and saved as a User template. |
Modify a Built-in Template
|
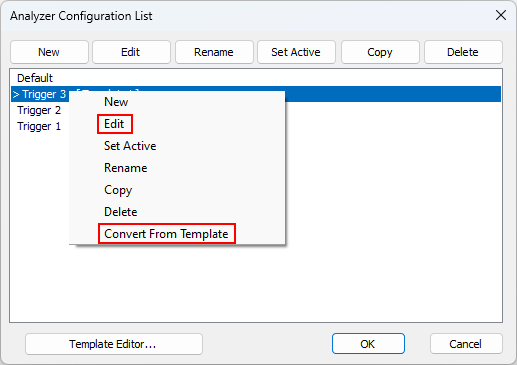
Select Edit Analyzer Configuration List by clicking Analyzer Configuration arrow. |
|
Right-click on the Trigger you want to modify. |
|
Select Convert From Template. winIDEA will convert selected trigger(s) from a template to normal type. |
|
Select Edit which will open Analyzer Configuration dialog. |
|
Click Configure... in Analyzer Configuration dialog. |
|
Modify Triggers / Events / Actions to your requirements. |

|
Save your modified configuration by selecting Create Template. |

