AMD Zynq
In this topic:
•Ultrascale+: Loading a bitstream into the FPGA
JTAG Chain
JTAG chain is configurable within Zynq SoC. Cascaded JTAG works with empty device. User must provide soft core to connect external pins to ARM DAP if Independent JTAG mode is desired. Refer to Mode Pin Settings and JTAG and DAP Subsystem chapters in Zynq reference manual for more information.
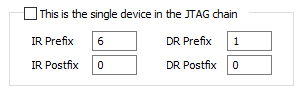
As JTAG chain is configurable it has to be properly set in JTAG settings. Set JTAG prefixes as depicted for Cascaded JTAG via Hardware / CPU Options / JTAG. JTAG chain details...
Ultrascale+: Loading a bitstream into the FPGA
Loading a bitstream into the FPGA for all Zynq Ultrascale+ devices is supported in winIDEA. Refer to FPGA bitstream programming for more information.
Example
The following example is created for AMD XC7Z100 target device. Make sure that the specific Zynq version is selected in the Debug / Configure Session / SoCs. Selecting specific Zynq version will add the FPGA entry to the Hardware drop-down menu.
1. Open the FPGA Configuration window by clicking Hardware / AMD XC7Z100_FPGA / Configure.
2. Under Download Files add your prepared bitstream file and deselect the Verify option.
 |
3. OPTIONAL: Default bitstream files are generated requiring byte swap. When manual conversion was done on bitstream file, this option can be disabled under FLAGS Configuration
|
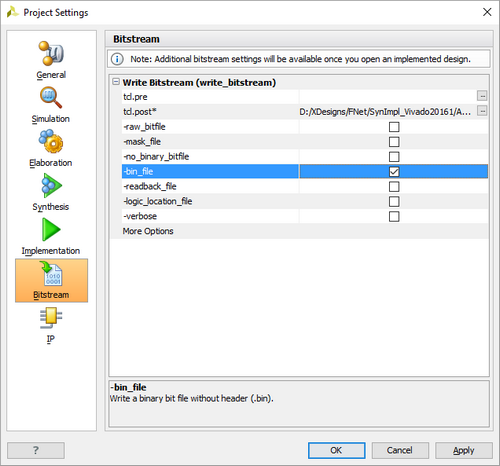
Bitstream generation tools might include an info header into bitstream file. Please configure tool to not generate this header or remove it manually before using the file in winIDEA. E.g.: In Vivado under Project Settings, check “-bin_file*” option to have development tool generate bin file without header. |

 |
 |
4. Execute operation via Hardware / AMD XC7Z100_FPGA.