Configure Cortex-M DWT Data Comparator
In this topic:
•Configuring Profiler Data Area
•Use case: Compare on Address and Data
•Compare on Address and Data Value on Data Access
•Compare on Address Range and Data Value on Data Access
•Use case: Compare on Address 1 / Address 2 and Data
•Compare on Address 1 or Address 2 and Data Value
•Compare on Address 1 range or Address 2 range and Data value
Introduction
Each comparator can be configured for a specific address or/and for an address range (Address comparators). All comparators have a LSB masking register which implements an ignore mask. The size of the ignore mask is 0-31 bits, applied to address range matching. The range can be specified via the Ignore LSB bits drop-down menu.
Comparator 0 can compare against the clock cycle counter (CYCCNT).
Comparator 1 supports data comparison (Data comparator) and linking with another comparator. It can be set to two addresses or/and two ranges, and data value. In this case Comparator 3 and/or 2 are reserved.
A full DWT module contains four comparators that you can configure as:
•Hardware watchpoint
•ETM trigger
•PC sampler event trigger
•Data address sampler event trigger
Configuring Profiler Data Area
A more simple configuration is possible via Analyzer Configuration | Profiler page dialog and the Profiler Data Area dialog. Follow the tutorial Tracing with BlueBox tools - Profile Data which will guide you through basic configurations.
Configuring Comparators
For specific use cases and linking Comparator 1, winIDEA offers a manual configuration of the DWT module. Use cases cover comparing values on Address or/and Data with an option Ignore LSB bits:
1. Address
•Compare on Address on Data Access
•Compare on Address Range on Data Access
2. Address and Data
•Compare on Address and Data Value on Data Access
•Compare on Address Range and Data Value on Data Access
3. Address 1 / Address 2 and Data
•Compare on Address 1 or Address 2 and Data value
•Compare on Address 1 range or Address 2 range and Data value
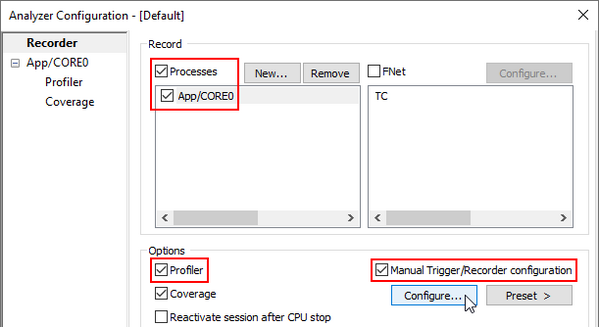
Make sure Processes, the application you wish to record (e.g. App/ CORE0) and Profiler are enabled. To link Comparator 1 with Comparator 3 and/or Comparator 2, Comparator 0 has to be configured first.
|
In the Analyzer Configuration | Recorder, enable Manual Hardware Trigger and click on Configure. |

|
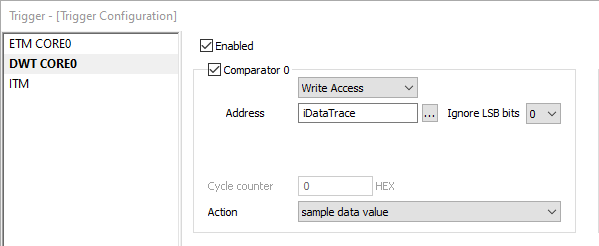
Open the DWT CORE0 page and enable Comparator 0. |

|
Select Write Access from the drop-down menu. |

|
Select an address in the Address field. e.g. iDataTrace. |

|
Select sample data value from the Action drop-down menu. |

Use case: Compare on Address
Compare on Address on Data Access
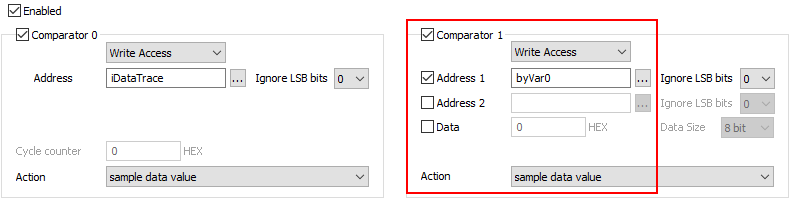
Configure Comparator 1.
|
Enable Comparator 1. |
|
Select Write Access from the drop-down menu. |
|
Enable Address 1 and select an address in the field. |
|
Select sample data value from the Action drop-down menu. |
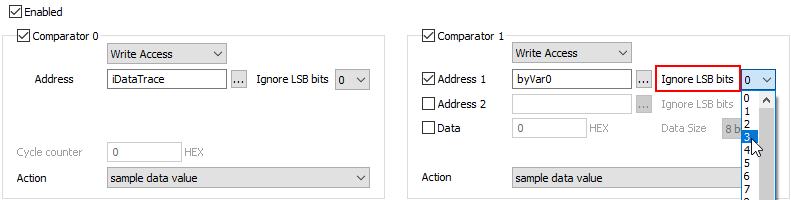
Compare on Address Range on Data Access
Configure Comparator 1 with option Ignore LSB bits
|
Select a number from the Ignore LSB bits drop-down menu. |
Use case: Compare on Address and Data
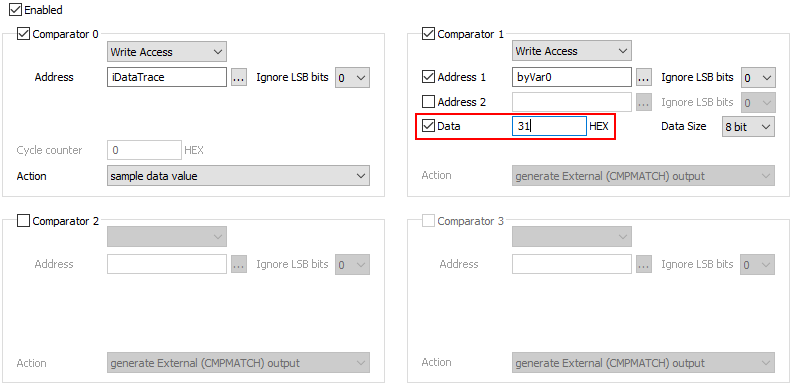
Compare on Address and Data Value on Data Access
Comparator 1 and Address 1 have been configured in the previous steps.
|
Enable Data and select the HEX value. |
|
Select data size from the Data Size drop-down menu. |
Comparator 3 is reserved.
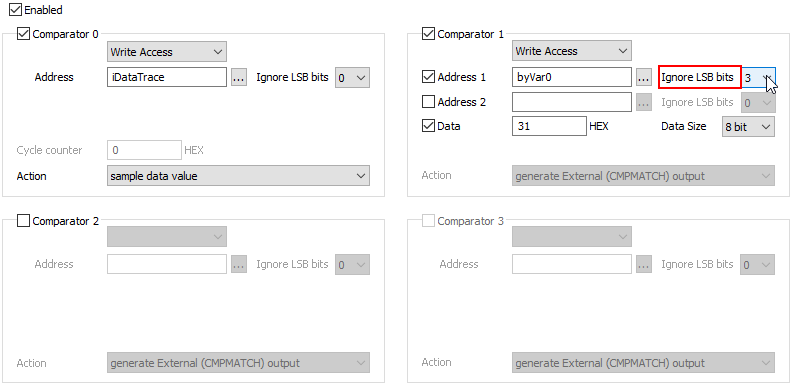
Compare on Address Range and Data Value on Data Access
|
Select a number from the Ignore LSB bits drop-down menu. |
Comparator 3 is reserved.
Use case: Compare on Address 1 / Address 2 and Data
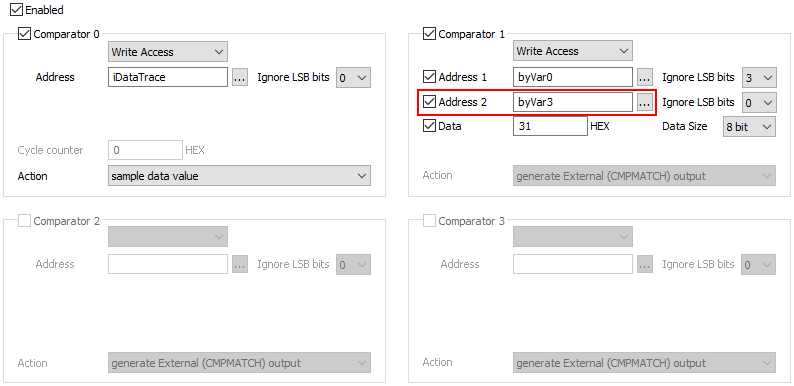
Compare on Address 1 or Address 2 and Data Value
Comparator 1, Address 1 and Data have been configured in the previous steps. Enable Address 2 and select and address in the field.
Comparators 2 and 3 are reserved.
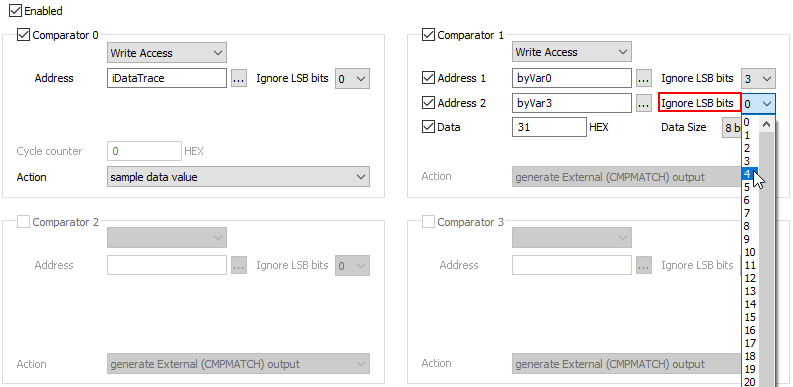
Compare on Address 1 range or Address 2 range and Data value
|
Select a number from the Ignore LSB bits drop-down menu for Address 2. |
Comparators 2 and 3 are reserved.
Start a New Analyzer Session
Once the desired configuration has been achieved, a New Analyzer Session can be started.
More resources
•Data Watchpoint and Trace (DWT)